Sharp Apps
Sharp Apps are a new approach to dramatically simplify .NET Wep App development and provide the most productive development experience possible whilst maximizing reuse and component sharing. They also open up a number of new use-cases for maintaining clean isolation between front-end and back-end development with front-end developers not needing any knowledge of C#/.NET to be able to develop UIs for high-performance .NET Web Apps. Sharp Apps also make it easy to establish and share an approved suite of functionality amongst multiple websites all consuming the same back-end systems and data stores.
Sharp Apps leverages #Script to develop entire content-rich, data-driven websites without needing to write any C#, compile projects or manually refresh pages - resulting in the easiest and fastest way to develop Web Apps in .NET!
Ultimate Simplicity
Not having to write any C# code or perform any app builds dramatically reduces the cognitive overhead and conceptual knowledge required for development where the only thing front-end Web developers need to know is #Script's familiar syntax and what methods are available to call. Because of #Script's JavaScript compatibility, developing a Website with #Script will be instantly familiar to JavaScript devs despite calling and binding directly to .NET APIs behind the scenes.
All complexity with C#, .NET, namespaces, references, .dlls, strong naming, packages, MVC, Razor, build tools, IDE environments, etc has been eliminated leaving all Web Developers needing to do is run the cross-platform x dotnet tool and configure a simple app.settings text file to specify which website folder to use, which ServiceStack features to enable, which db or redis providers to connect to, etc. Not needing to build also greatly simplifies deployments where multiple websites can be deployed with a single rsync or xcopy command or if deploying your App in a Docker Container, you just need to copy your website files, or just the app.settings if you're using an S3 or Azure Virtual File System.
Rapid Development Workflow
The iterative development experience is also unparalleled for a .NET App, no compilation is required so you can just leave the x dotnet tool running whilst you add .html files needed to build your App and thanks to the built-in Hot Reloading support, pages will refresh automatically as you save. You'll just need to do a full page refresh when modifying external .css/.js files to bypass the browser cache and you'll need to restart x to pick up any changes to your app.settings or added any .dlls to your /plugins folder.
FREE!
To remove friction & barriers to adoption all app and x dotnet tools used to run all Sharp and Gist Desktop Apps utilize an unrestricted suite of ServiceStack Software that can be developed & distributed free without a commercial license.
Should it be needed if exceeding free-quotas (most Sharp Apps don't) when developing locally as a .NET Core Web App (i.e. instead of running using the app tool), you can bypass any restrictions with a Trial License Key.
Getting Started
All Sharp Apps can be run either as .NET Core Web Apps by installing the x dotnet tool:
$ dotnet tool install -g x$ x openBy default this will list all sharp-apps available:
 1. redis       Simple, lightweight, versatile Redis Admin UI
 2. spirals     Explore and generate different Spirals with SVG
 3. blog        Minimal, multi-user Twitter Auth blogging app
 4. rockwind    Example combining Rockstars website + data-driven Northwind Browser
 5. redis-html  Redis Admin Viewer developed as server-generated HTML Website
 6. plugins     Extend Apps with Plugins, ServiceStack Services and other C# extensions
 7. chat        Extensible App with custom AppHost leveraging OAuth + SSE for real-time Chat
 8. bare        Basic Sharp Content Website
 9. studio      Admin UI for managing ServiceStack Instances (v5.9+)
10. sharpdata   Instant UI for browsing multiple RDBMS's
11. win32       Demo Desktop App showcasing Win32 APIs

Usage: x open <name>
Where any of the apps can be installed by specifying the name, e.g. spirals can be run with:
$ x open spiralsWhich will run the latest version of the spirals App each time. After an App has been run once or installed, you can run its local version with x run:
$ x run spiralsWindows 64 Desktop App
Each Sharp App can also be run as a .NET Core Windows Desktop App by installing the app dotnet tool:
$ dotnet tool install -g appThen running the Web App with app instead of x.
$ app open spiralsSpirals
Spirals is a good example showing how easy it is to create .NET Core Desktop Web Apps utilizing HTML5's familiar and simple development model to leverage advanced Web Technologies like SVG in a fun, interactive and live development experience.
YouTube: youtu.be/2FFRLxs7orU
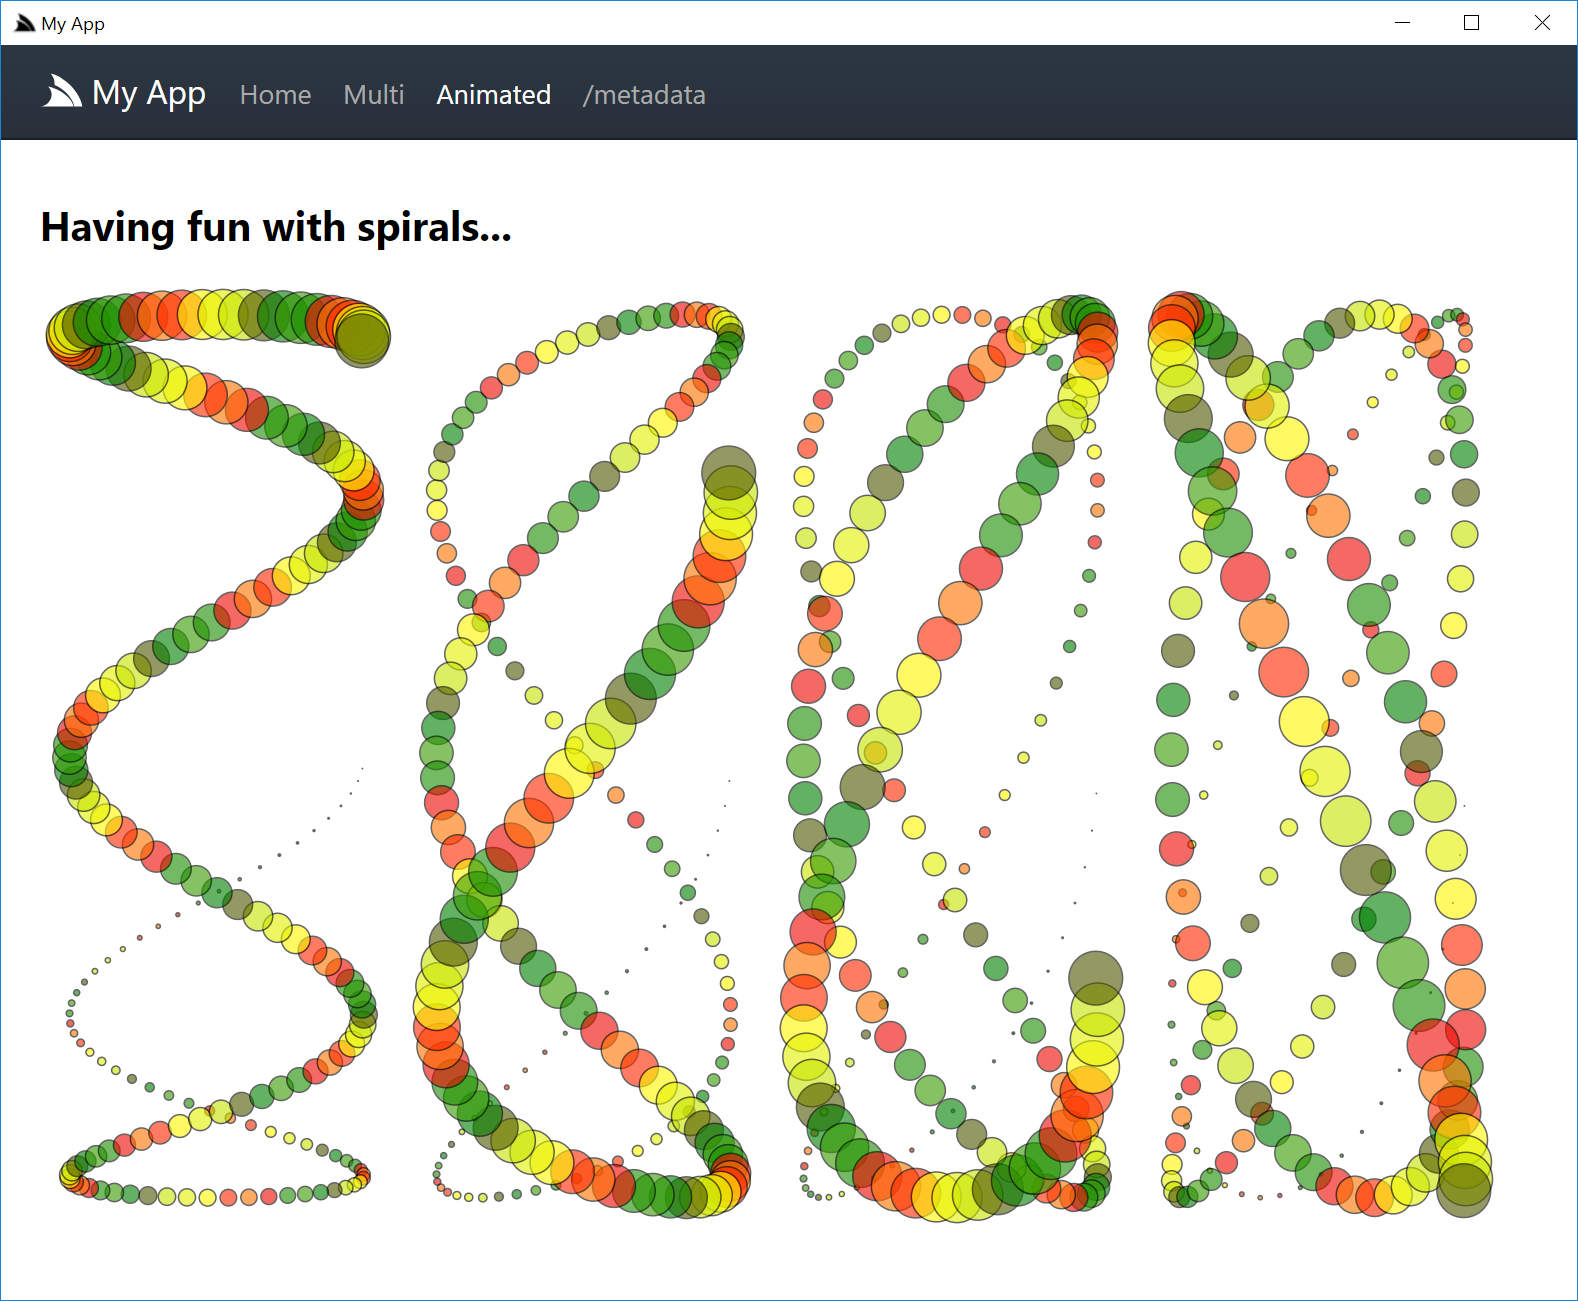
See the Making of Spirals for a walk through on how to create the Spirals Web App from scratch.
Sharp App
The easiest way to create an empty Sharp App is to run app init from an Empty App Directory:
$ md Acme && cd Acme && web initWhich will create an empty Sharp App as seen in the Spirals video above:
SharpApp Project Templates
A more complete starting option is to start from one of the project templates below. All project templates can be installed using the x new tool, which if not already can be installed with:
$ dotnet tool install --global xVue Desktop
The most versatile project template is the Vue Desktop Template which is capable of building a standard vue-lite .NET Core Web App that can also be bundled into a single GitHub Gist and run as a Gist Desktop App:
To run Chromium Desktop Apps install the app tool:
$ dotnet tool install -g appThis has all the same features of the x tool where you can create new projects with:
$ app new vue-desktop ProjectNameThen after packaging the Web App into a Sharp App with:
$ npm run pack-appYou can run it as a Desktop App by running the app tool in the dist folder:
$ cd dist && appBare SharpApp
To start with a simple and minimal website, create a new bare-app project template:
$ x new bare-app ProjectNameThis creates a multi-page Bootstrap Website with Menu navigation that's ideal for content-heavy Websites.
Parcel SharpApp
For more sophisticated JavaScript Sharp Apps we recommended starting with the parcel-app project template:
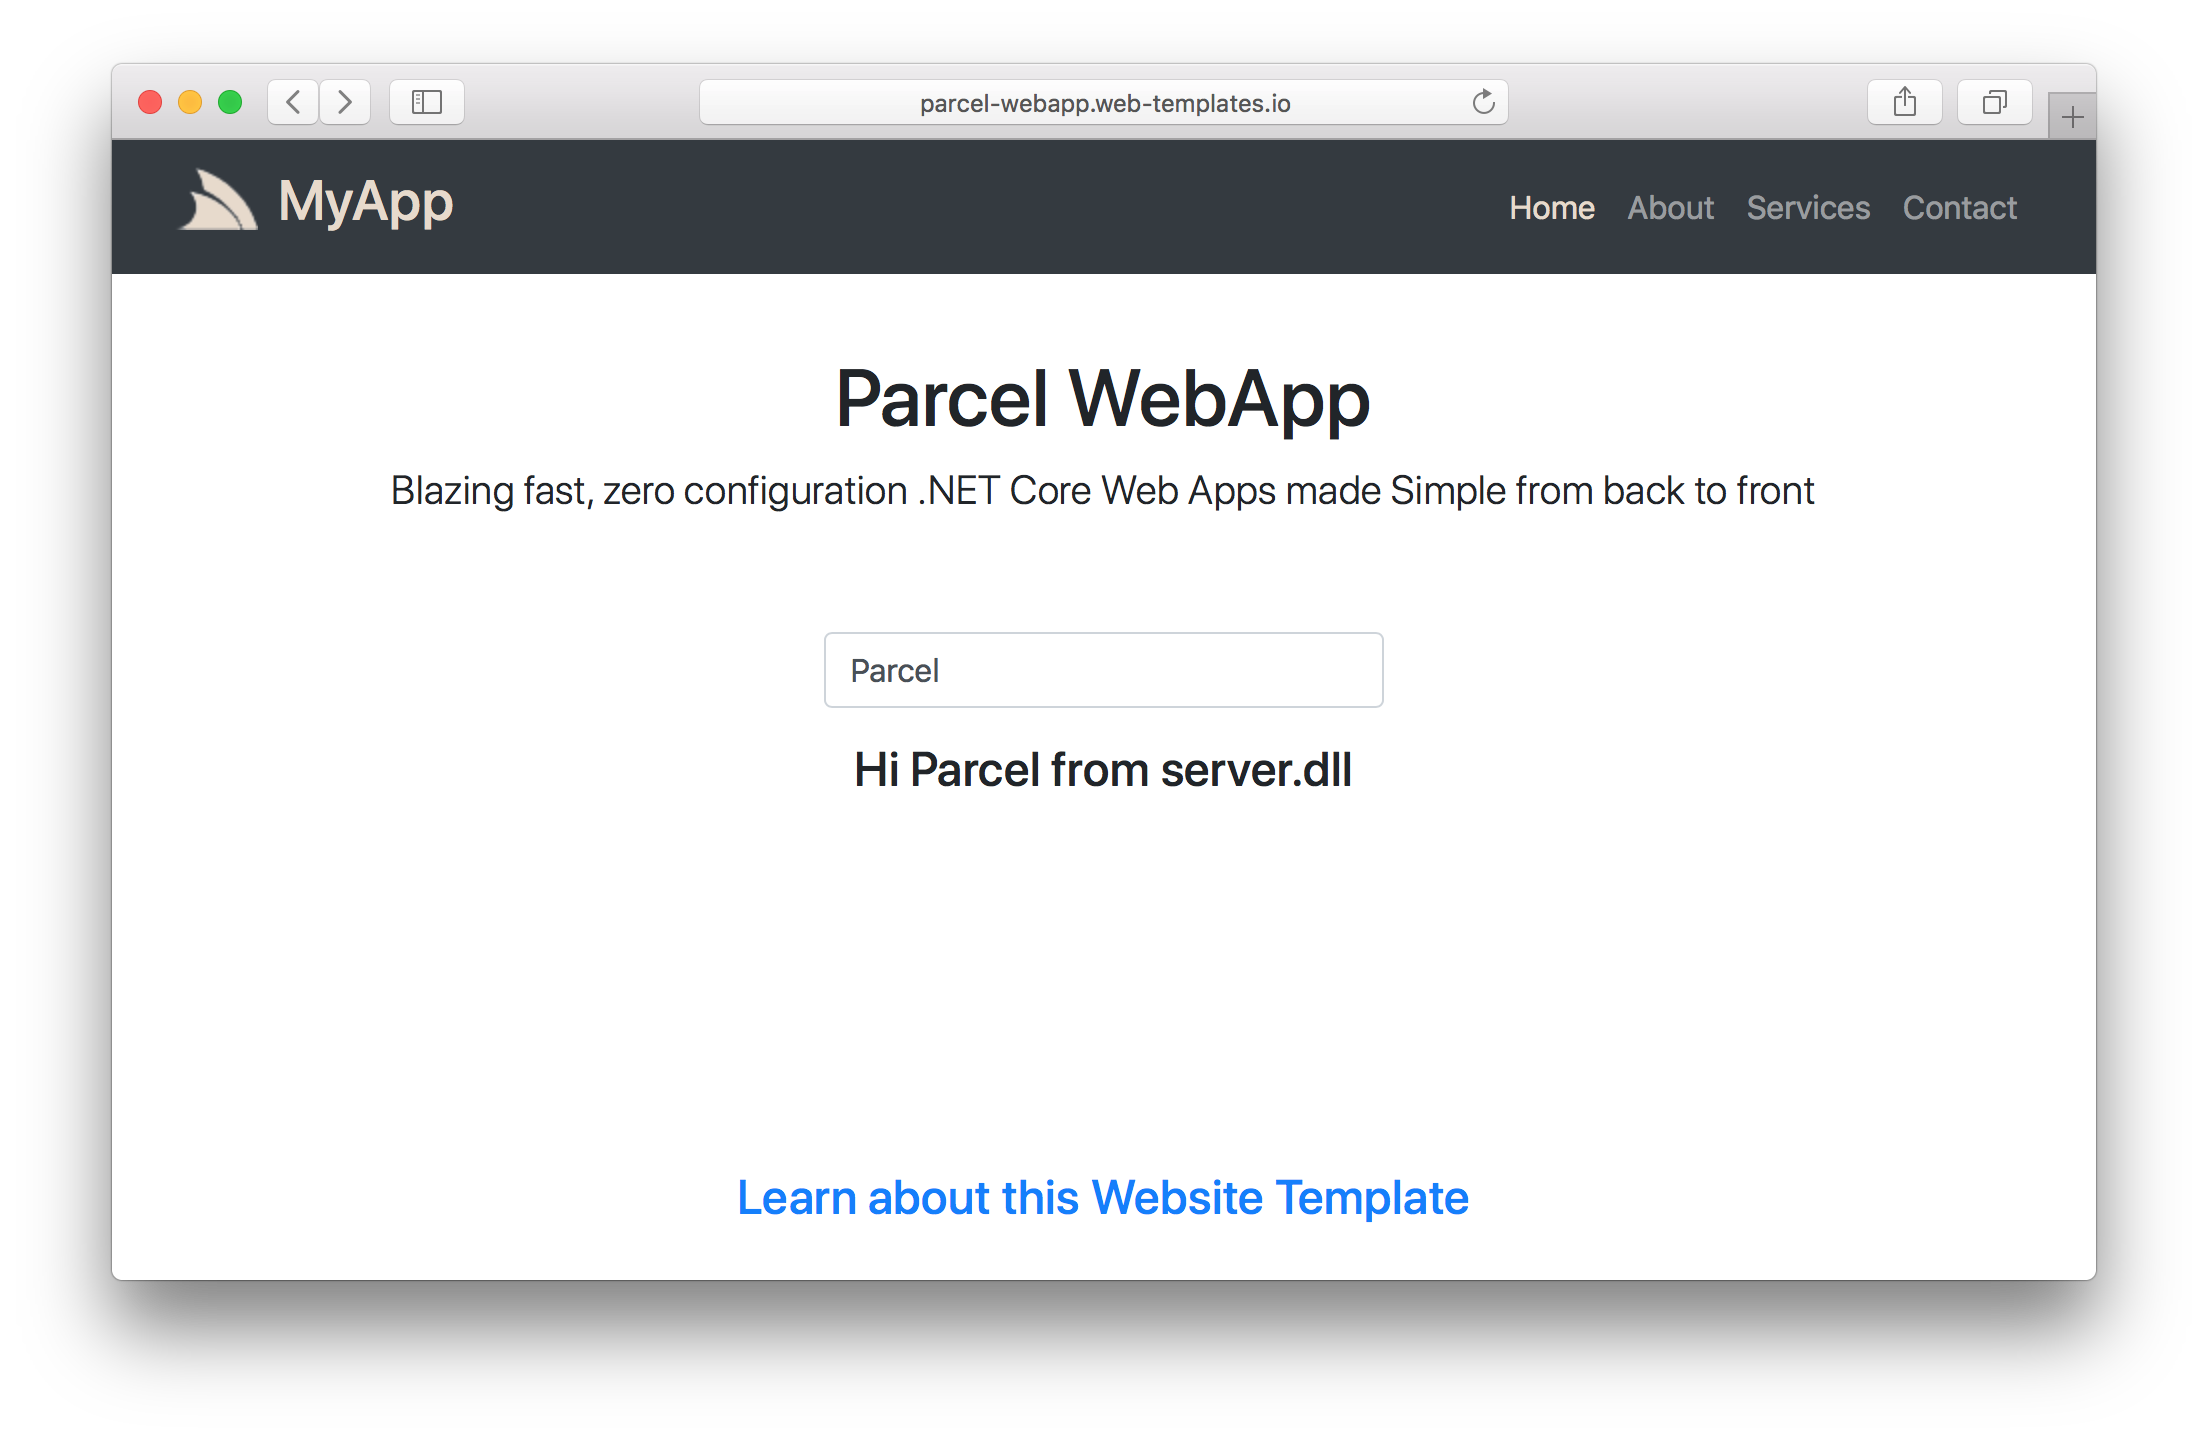
$ x new parcel-app ProjectNameThis provides a simple and powerful starting template for developing modern JavaScript .NET Core Sharp Apps utilizing the zero-configuration Parcel bundler to enable a rapid development workflow with access to best-of-class web technologies like TypeScript that's managed by pre-configured npm scripts to handle its entire dev workflow.
If needed, it includes an optional server component containing any C# extensions needed that's automatically built and deployed to the app's /plugins folder when started. This enables an extensible .NET Core Web App with an integrated Parcel bundler to enable building sophisticated JavaScript Apps out-of-the-box within a live development environment.
Cloud Apps Starter Projects
If you intend to deploy your Web App on AWS or Azure you may prefer to start with one of the example Cloud Apps below which come pre-configured with deployment scripts for deploying with Travis CI and Docker:
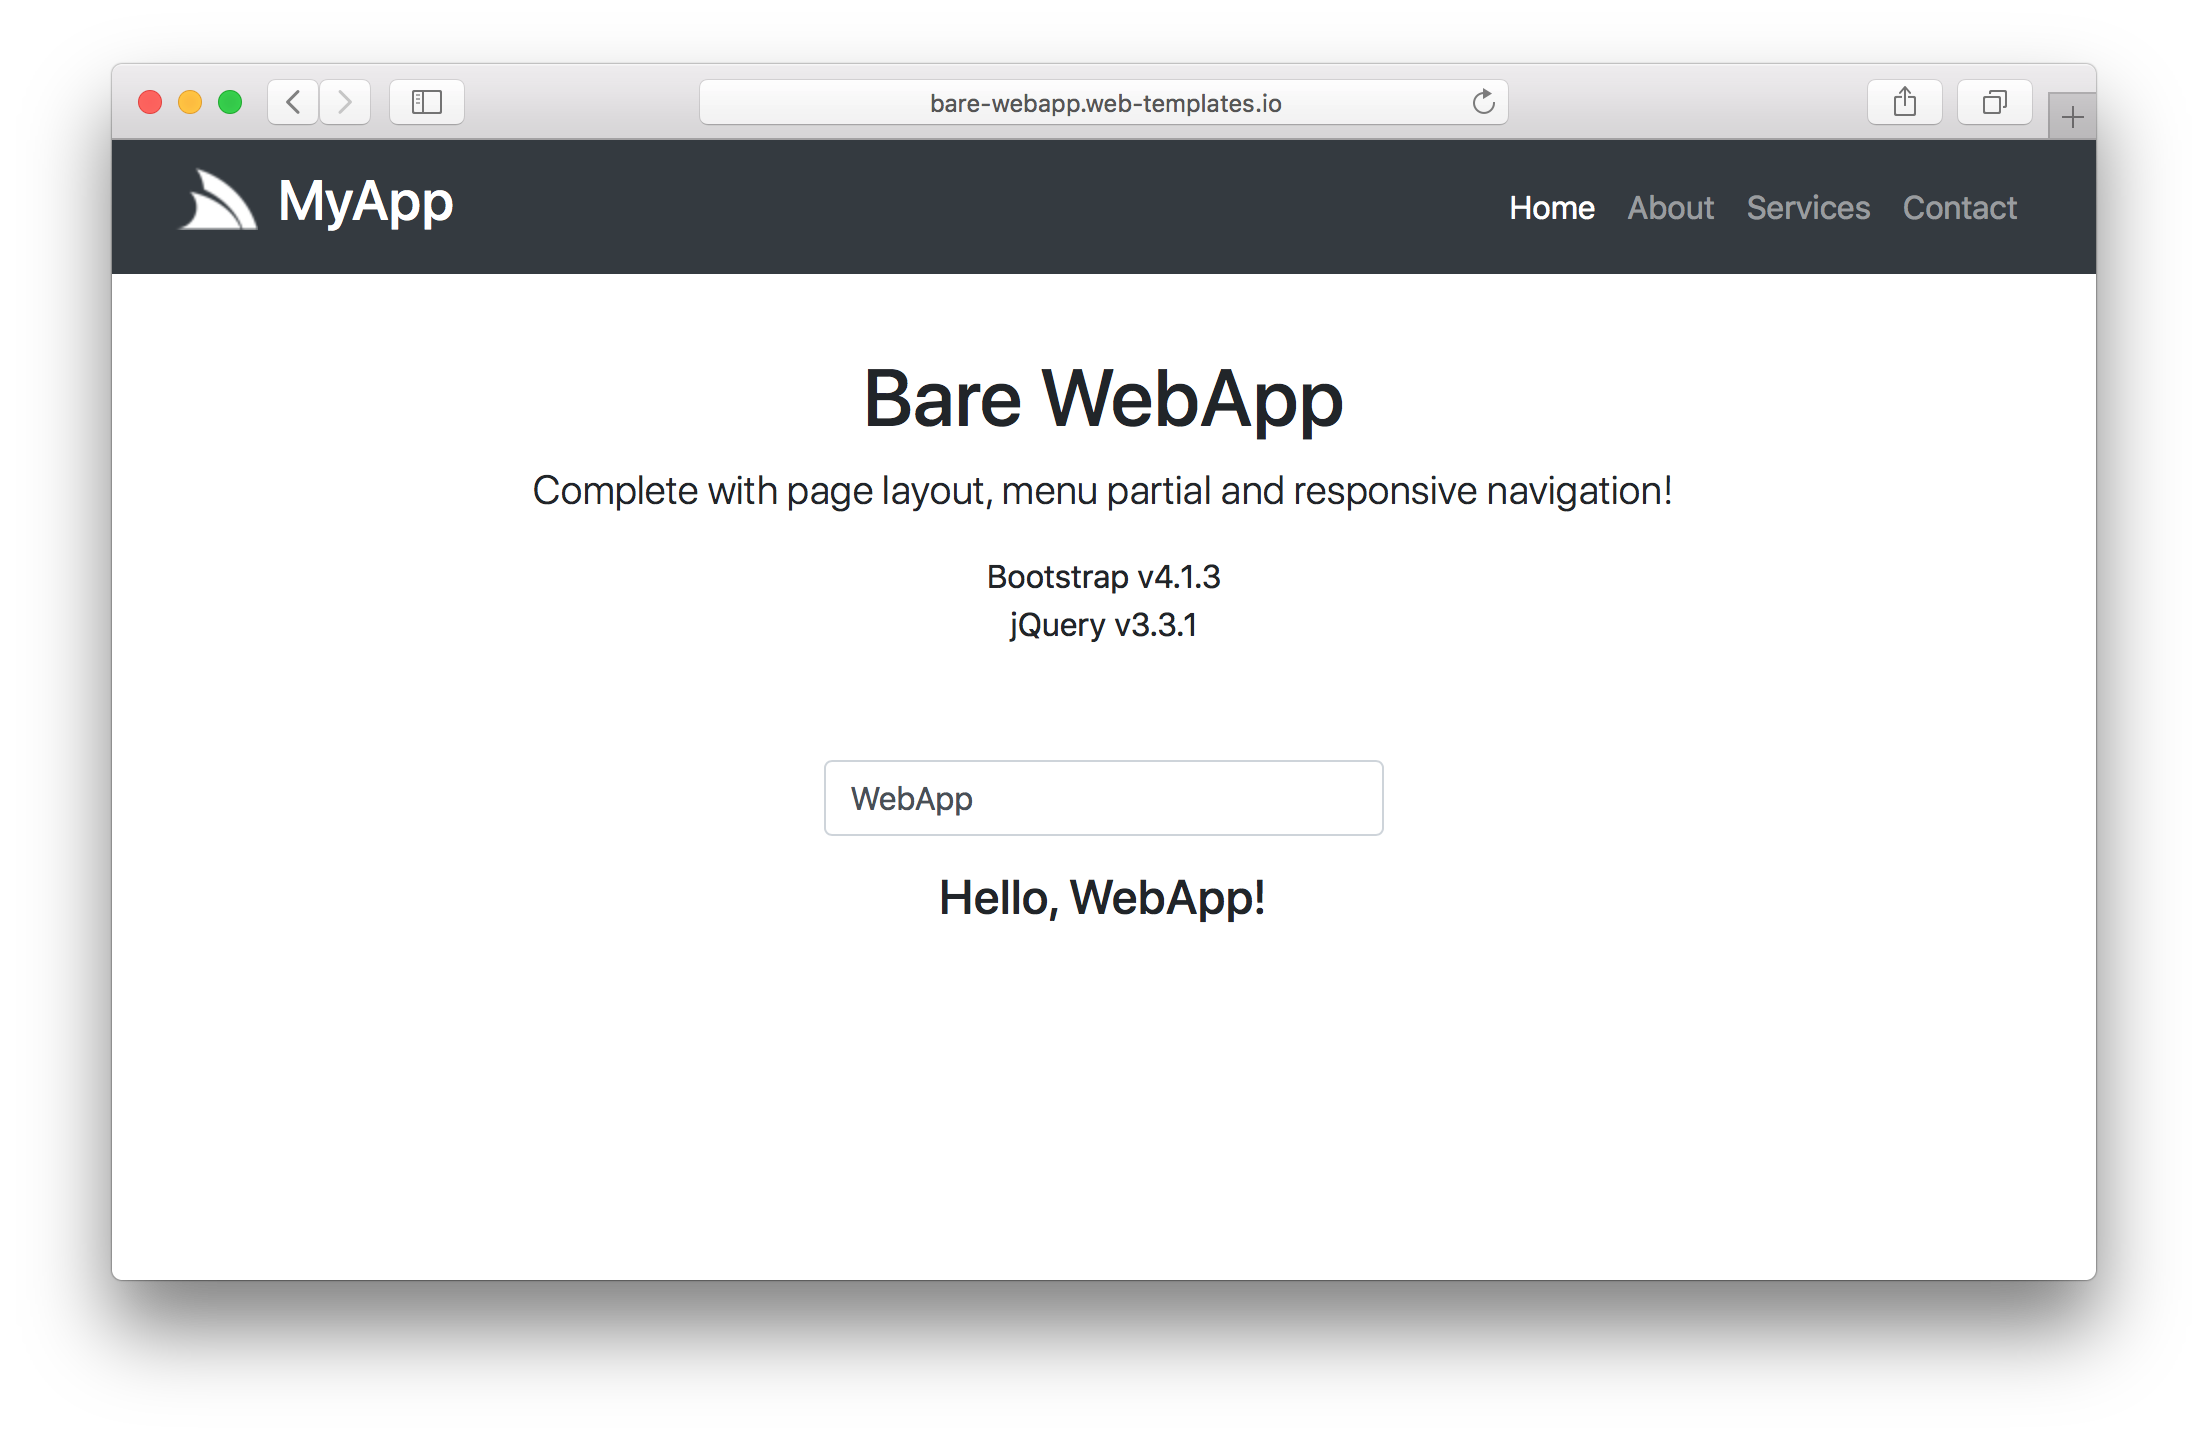
About Bare WebApp
The Getting Started project contains a copy of the bare-app.web-templates.io project below which is representative of a typical Company splash Website:
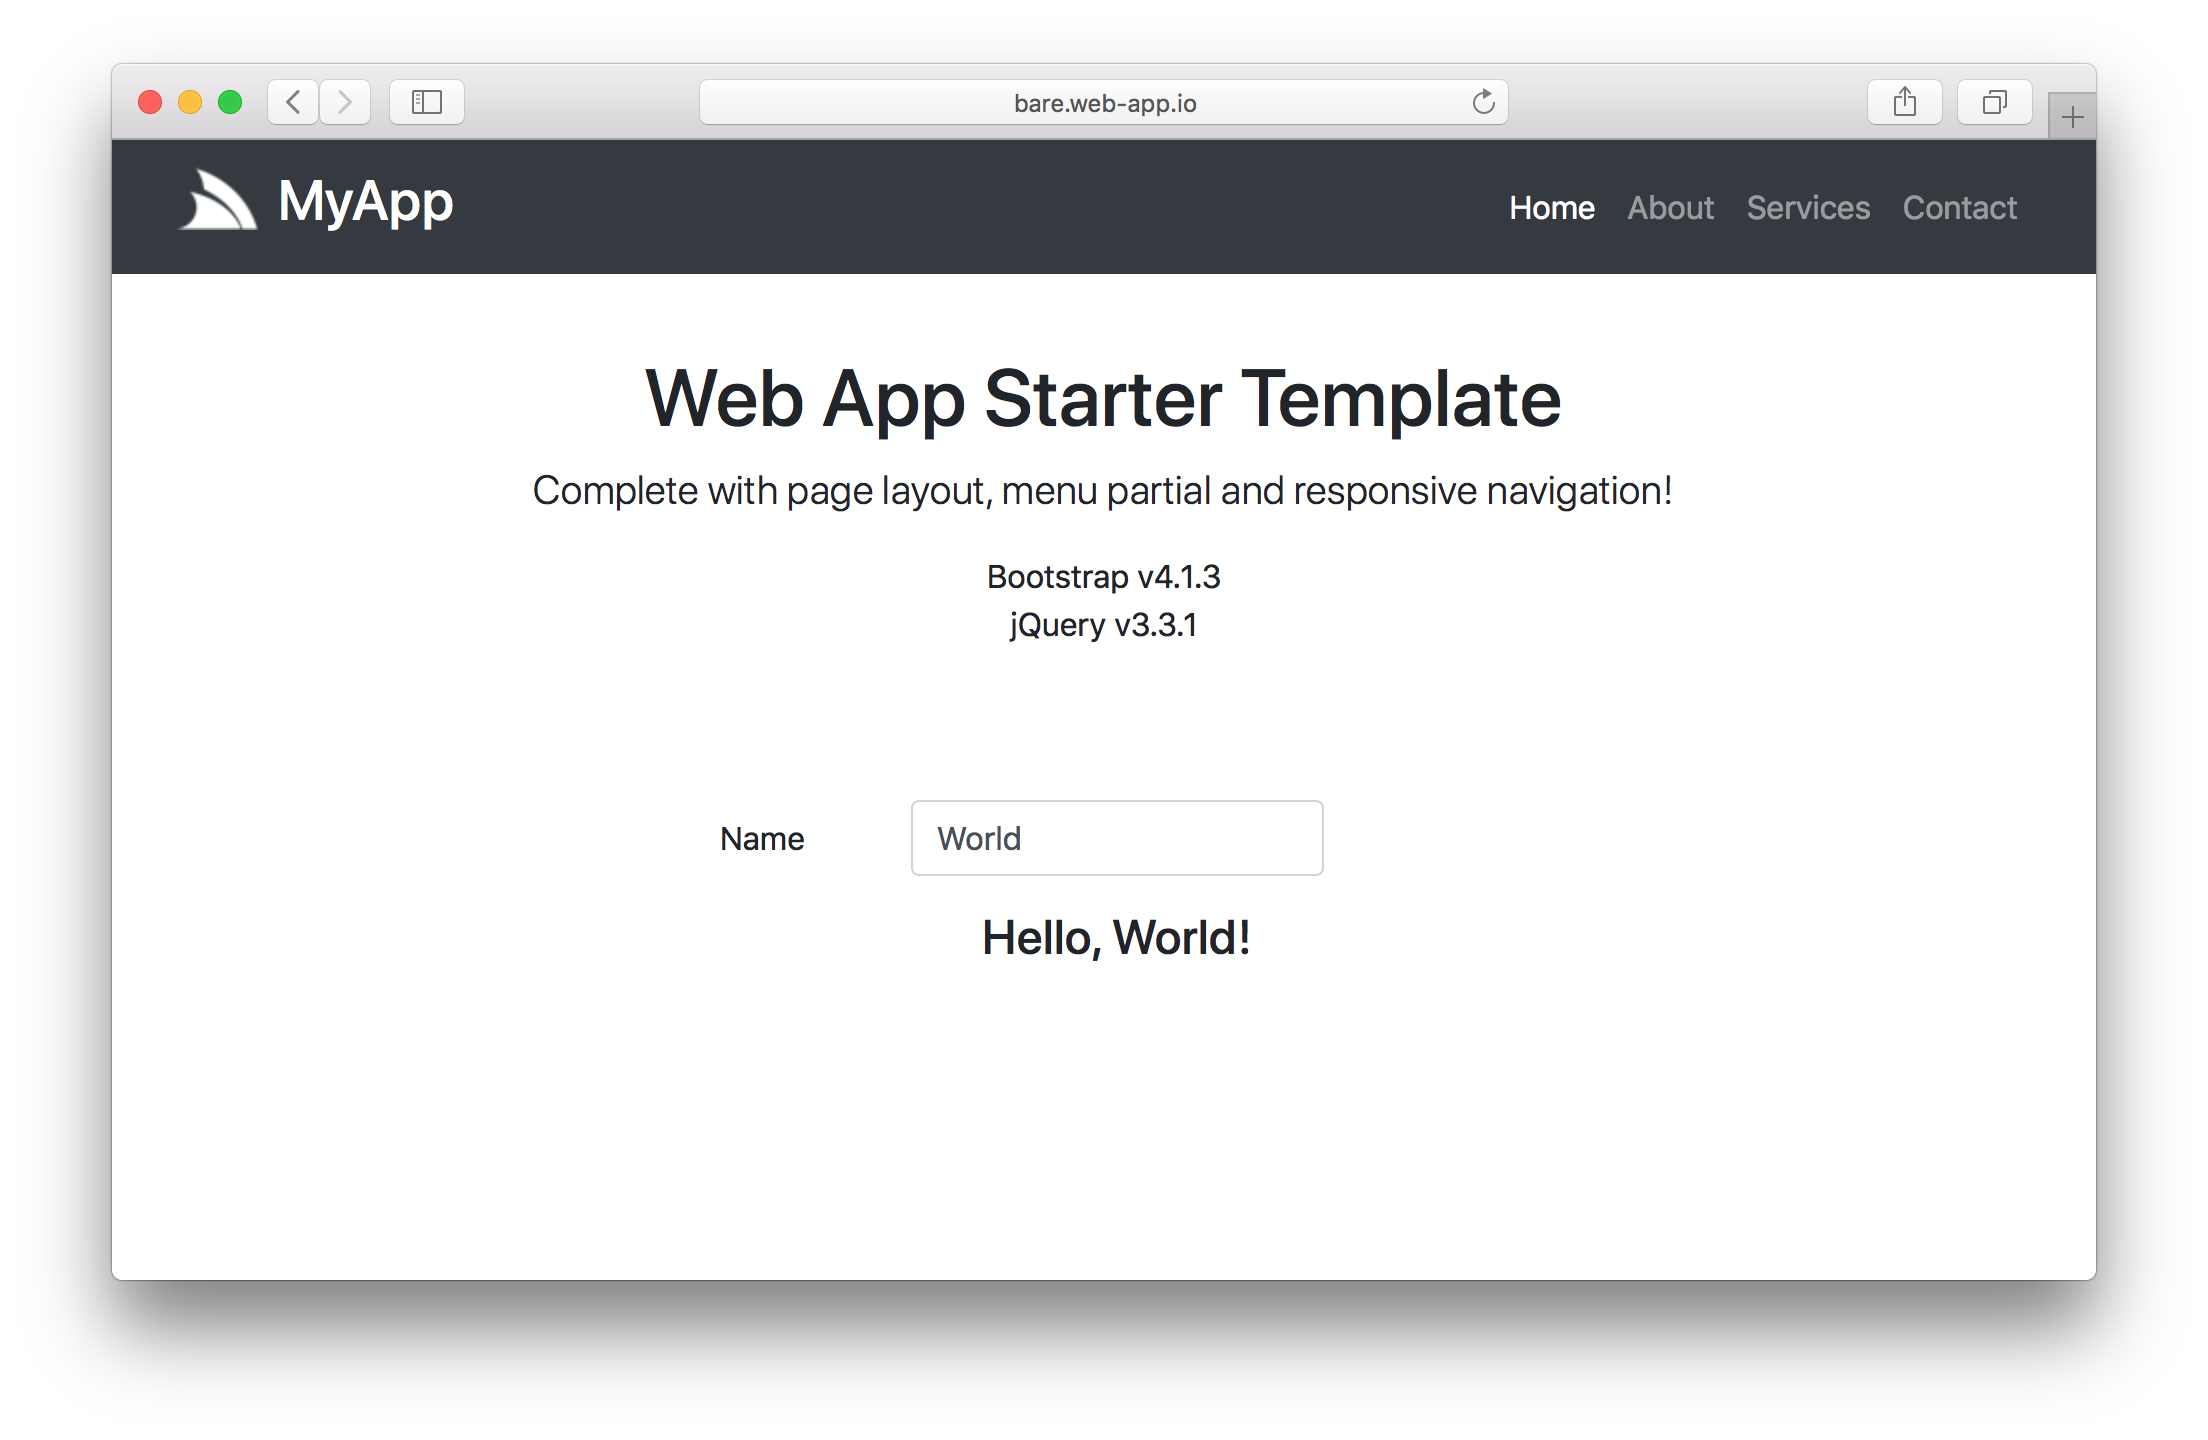
The benefits over using a static website is improved maintenance as you can extract and use its common _layout.html instead of having it duplicated in each page. The menu.html partial also makes menu items easier to maintain by just adding an entry in the JavaScript object literal. The dynamic menu also takes care of highlighting the active menu item.
{{ { '/':         'Home',
     '/about':    'About',
     '/services': 'Services',
     '/contact':  'Contact',
   } |> toList |> to => links }}
Ideal for Web Designers and Content Authors
The other primary benefit is that this is an example of a website that can be maintained by employees who don't have any programming experience as #Script in their basic form are intuitive and approachable to non-developers, e.g: The title of each page is maintained as metadata HTML comments:
<!--
title: About Us
-->
#Script syntax is also the ideal way to convey variable substitution, e.g: <title>{{ title }}</title> and even embedding a partial reads like english {{ 'menu' |> partial }} which is both intuitive and works well with GUI HTML designers.
app.settings
Below is the app.settings for a Basic App:
debug true
name Bare Sharp App
debug true controls the level of internal diagnostics available and whether or not Hot Reloading is enabled.
About Parcel WebApp
The Parcel SharpApp template is maintained in the following directory structure:
-
/app- Your Web App's published source code and any plugins -
/client- The Parcel managed Client App where client source code is maintained -
/server- Extend your Web App with an optionalserver.dllplugin containing additional Server functionality -
/web- The Web App binaries
Most development will happen within /client which is automatically published to /app using parcel's CLI that's invoked from the included npm scripts.
client
The difference with templates-app is that the client source code is maintained in the /client folder and uses Parcel JS to automatically bundle and publish your App to /app/wwwroot which is updated with live changes during development.
The client folder also contains the npm package.json which contains all npm scripts required during development.
If this is the first time using Parcel, you will need to install its global CLI:
$ npm install -g parcel-bundler
Then you can run a watched parcel build of your Web App with:
$ npm run dev
Parcel is a zero configuration bundler which inspects your .html files to automatically transpile and bundle all your .js and .css assets and other web resources like TypeScript .ts source files into a static .html website synced at /app/wwwroot.
Then to start the ServiceStack Server to host your Web App run:
$ npm run server
Which will host your App at http://localhost:5000 which in debug mode will enable hot reloading
which will automatically reload your web page as it detects any file changes made by parcel.
server
To enable even richer functionality, this Sharp Apps template is also pre-configured with a custom Server project where you can extend your Web App with Plugins where all Plugins, Services, Filters, etc are automatically wired and made available to your Web App.
This template includes a simple ServerPlugin.cs which contains an Empty ServerPlugin and Hello Service:
public class ServerPlugin : IPlugin
{
    public void Register(IAppHost appHost)
    {
    }
}

//[Route("/hello/{Name}")] // Handled by /hello/_name.html API page, uncomment to take over
public class Hello : IReturn<HelloResponse>
{
    public string Name { get; set; }
}

public class HelloResponse
{
    public string Result { get; set; }
}

public class MyServices : Service
{
    public object Any(Hello request)
    {
        return new HelloResponse { Result = $"Hi {request.Name} from server.dll" };
    }
}
To build the server.csproj project and copy the resulting server.dll to /app/plugins/serer.dll which will require restarting the server to load the latest plugin:
$ npm run server
This will automatically load any Plugins, Services, Filters, etc and make them available to your Web App.
One benefit of creating your APIs with C# ServiceStack Services instead of API Pages is that you can generate TypeScript DTOs with:
$ npm run dtos
Which saves generate DTOs for all your ServiceStack Services in dtos.ts which can then be accessed in your TypeScript source code.
If preferred you can instead develop Server APIs with API Pages, an example is included in /client/hello/_name.html
{{ { result: `Hi ${name} from /hello/_name.html` } |> return }}Which as it uses the same data structure as the Hello Service above, can be called with ServiceStack's JsonServiceClient and generated TypeScript DTOs.
The /client/index.ts shows an example of this where initially the App calls the C# Hello ServiceStack Service:
import { client } from "./shared";
import { Hello, HelloResponse } from "./dtos";

const result = document.querySelector("#result")!;

document.querySelector("#Name")!.addEventListener("input", async e => {
  const value = (e.target as HTMLInputElement).value;
  if (value != "") {
    const request = new Hello();
    request.name = value;
    const response = await client.get(request);
    // const response = await client.get<HelloResponse>(`/hello/${request.name}`); //call /hello/_name.html
    result.innerHTML = response.result;
  } else {
    result.innerHTML = "";
  }
});
But while your App is running you can instead toggle the uncommented the line and hit Ctrl+S to save index.ts which Parcel will automatically transpile and publish to /app/wwwroot that will be detected by Hot Reload to automatically reload the page with the latest changes. Now typing in the text field will display the response from calling the /hello/_name.html API instead.
Deployments
During development Parcel maintains a debug and source-code friendly version of your App. Before deploying you can build an optimized production version of your App with:
$ npm run build
Which will bundle and minify all .css, .js and .html assets and publish to /app/wwwroot.
Then to deploy Sharp Apps you just need to copy the /app and /web folders to any server with .NET 5.0 runtime installed.
The Deploying Sharp Apps docs.
Reference
All common functionality contained in Sharp Apps are implemented in the dotnet tools, most of which is contained within these 2 classes (for all dotnet tools):
The app dotnet tool contains additional Chromium Desktop related features in its /src/App project.
app.settings options
These different options are covered in the various example Sharp Apps, e.g:
- DB settings
- Redis settings
- Virtual File System (VFS) settings
- Configuring Plugins
- Using a Custom AppHost
- Passing Rich Config Arguments to your App
| name | default | description |
|---|---|---|
| bind | localhost | Which hostname to bind .NET Core Server to |
| ssl | true | Use https for .NET Core Server |
| port | 5001 | Which port to bind .NET Core Server to |
| name | Sharp App | AppHost name (also used in Shortcuts) |
| debug | ASP.NET Default | Enable additional logging & diagnostics |
| contentRoot | app.settings dir | ASP.NET Content Root Directory |
| webRoot | wwwroot/ | ASP.NET Web Root Directory |
| apiPath | /api | Path of Sharp APIs |
| defaultRedirect | Default Fallback RedirectPath | |
| db | OrmLite Dialect: sqlite, sqlserver, mysql postgres | |
| db.connection | RDBMS Connection String | |
| redis.connection | ServiceStack.Redis Connection String | |
| files | VFS provider: filesystem, s3, azureblob | |
| files.config | Virtual File System JS Object Configuration | |
| checkForModifiedPagesAfterSecs | How long to check backing VFS provider for changes | |
| defaultFileCacheExpirySecs | How long to preserve static file caches for | |
| defaultUrlCacheExpirySecs | How long to preserve URL caches for | |
| features | List of plugins to load | |
| markdownProvider | MarkDig | Markdown provider: MarkdownDeep, Markdig |
| jsMinifier | NUglify | JS Minifier: NUglify, ServiceStack |
| cssMinifier | NUglify | CSS Minifier: NUglify, ServiceStack |
| htmlMinifier | NUglify | HTML Minifier: NUglify, ServiceStack |
| icon | favicon.ico | Relative or Absolute Path to Shortcut & Desktop icon |
| appName | Unique Id to identify Desktop App (snake-case) | |
| description | Short Description of Desktop App (20-150 chars) | |
| tags | Desktop App Tags space-delimited, snake-case, 3 max | |
| args.* | Any additional rich config args to define in App |
Desktop specific Apps like ServiceStack/Studio enable additional Desktop functionality by configuring the DesktopFeature plugin in ServiceStack.Desktop, e.g:
Plugins.Add(new DesktopFeature {
    // access role for Script, File & Download services
    AccessRole = Config.DebugMode
        ? RoleNames.AllowAnon
        : RoleNames.Admin,
    ImportParams = { // app.settings you want auto-populated in your App
        "debug",
        "connect",
    },
    // Create a URL Scheme proxy rule for each registered site
    ProxyConfigs = sites.Keys.Map(baseUrl => new Uri(baseUrl))
        .Map(uri => new ProxyConfig {
            Scheme = uri.Scheme,
            TargetScheme = uri.Scheme,
            Domain = uri.Host,
            AllowCors = true,
            IgnoreHeaders = { "X-Frame-Options", "Content-Security-Policy" },
        })
});